The What, The Why, and The How of Tag Management in Eloqua
Collecting actionable data using tools like Google Analytics is crucial for expanding your business’s online reach, converting leads, and optimizing a marketing strategy to foster meaning relationships with your audience.
However, collecting data for valuable insights is easier said than done. But if you use Eloqua as your marketing automation platform, you’re all equipped to collect your customers’ behavioral data and use it for various marketing opportunities.
Eloqua provides a page tagging functionality that enables you to implement and leverage online behavioral tracking.
In this article, we’ll talk about tag management in Eloqua and how it can benefit your business to categorize web pages, build a solid lead scoring strategy, and get a better sense of your true online audience.
What is a Page Tag Tool
A page tag tool allows you to categorize web pages on your site for quick reference, tracking, and reporting. Each page tag can have a number of different pages associated with it. For instance, the product line tag might have enterprise, small business, and reseller pages related to it if these are different product lines for your business.
You can use this information as a more intuitive way to segment, build lead score models, and report on web page performance.
Reasons to Add Page Tags in Eloqua
Page tag enables Eloqua administrators to categorize a page or group of pages using terms that are more relevant to users. Rather than implementing particular web addresses, users can employ industries, product names, or a custom internal value to gain better insights and targeting. For example, you may create a Possible Prospect Type tag that might include values of Enterprise, Small Business, and Reseller, each value being related to a particular page or pages. Or a High-Value Web Content tag might contain values of Contact Us Pages, Product Whitepapers, and Pricing Pages. Or you could just tick off the pages that dealt with pricing with a Pricing Pages tag. Eloqua page tags are important for:
-
Lead Scoring:
Score contacts based on the number of times they have visited certain pages or groups of pages within a set time frame, to identify the potential leads based on their behavioral data.
-
Segmentation:
Target contacts based on whether they have visited pages within certain tags. A good example is a user guide or a product datasheet, which can indicate strong interest in a specific offering.
-
Insights:
See what pages and topics are grabbing customers’ interest, so you can tailor your upcoming marketing campaigns or optimize existing content.
-
Reporting:
Use the page tag breakdown insight report to show the total number of page views within a given time frame by page tag and page tag group.
How to Add Tags in Eloqua
There may be times when you want to tag several websites with more than one tag. Doing this manually for each tag and website can be a tall order. However, Eloqua provides an option for creating a file and uploading the tags directly to the application using the wizard paradigm.
To upload page tags using a file:
1. Create and upload a file (.xls, .xlsx, .csv) with two columns. Column A for the URL and column B is for the tags for upload to function properly.
2. Launch one URL per row in the URL column (A).
3. Enter the tags that you want to apply to each website separated by commas.
4. Once your upload file is created and saved, navigate to Assets> Website Setup, then click Page Tagging.
5. Click on the Page Tagging drop-down menu, then click Upload Page Tags to launch the Page Tag Upload wizard.

6. Define a name for the upload and a description if required.
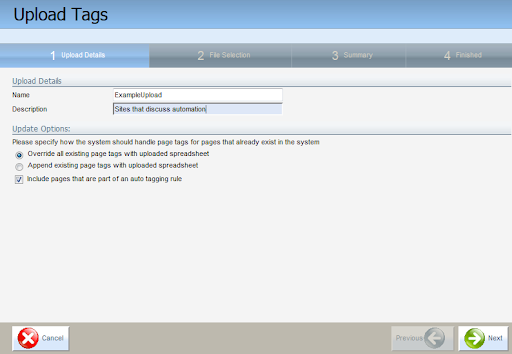
7. Define how Eloqua will apply the page tags being uploaded to pages that already exist on the site map.
8. Click Next to enter File Selection Tab.
9. Click Browse and find your file to upload.

10. Click Preview and Upload Data to view the data from the uploaded file.

11. Click Next to get on the summary tab.
12. Enter the right email address to which the result should be sent after the upload is complete.

13. Click on Finish to complete the wizard and start the upload.
14. Check the email address that you provided for confirmation that the upload was successful.
And voila, your tags would be created and saved in the system and ready for use.
Steps to Add Eloqua Tracking in Google Tag Manager
Tags are a bit of code you embed in your website’s Javascript or HTML to extract certain information.
To add Eloqua tracking code in Google Tag Manager (GTM):
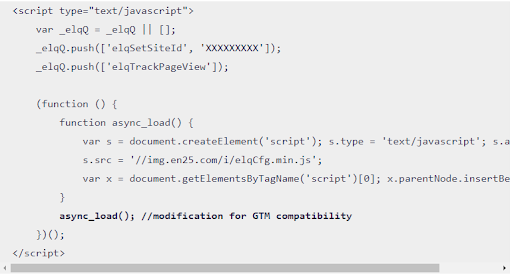
1. Get your base Eloqua tracking script. It should look like the following and your code should have a numerical value in place of ‘xxxxxxx’.

2. Replace the last two lines (if and else if statements) with a single call to the async_load() function.
In the original script, these two lines determine when will the Eloqua tracker fires. However, it is listening for an event (DOMContentLoaded or onload) that has potentially occurred before GTM fires the tag. Instead, we can remove this listener and use a DOM Ready firing rule (see Step 4), enabling GTM to control when the Eloqua tracker fires.
3. Place the edited code in a new Custom HTML tag in your GTM container.
4. Set the tag to fire when the DOM is loaded by creating a new trigger.
5. Create a new trigger and define the Trigger Type as Page View – DOM Ready.
6. Save the new changes, create a new container version, and publish.
Now, you’re all set to eliminate the manual processes of creating tags and making your marketing process more efficient.
Key Benefits of Eloqua Tag Management
There are many benefits that you can avail after implementing tag management in Eloqua. Eloqua tag management allows you to:
- Launch more revenue-generating campaigns faster and easier.
- Improve website performance through intelligent tag loading.
- Reduce cost by freeing up valuable marketing and IT resources for strategic projects.
- Ensure data governance and protection by auditing and controlling the data collection practices of each of your vendors.
The Bottom Line
Eloqua tag management makes your business run more efficiently. When marketers are able to run tags without going to IT for every step in the process, they can get real-time data and make informed decisions based on that data quickly. This translates to improved accuracy of your analytics system, increased conversion rate, more time saved, and better ROI.
And if you need an extra set of hands to implement tags in Eloqua, our experts will be happy to pitch in. Just drop us a line at [email protected] and we’ll take it from there.